— Drought Defense —
Laundry-to-Landscape greywater system

March 20, 2018
A TOP-LOADER WASHING MACHINE for a family of four uses a staggering 20,000 gallons of water a year—water that is pumped hundreds of miles to get to Southern California at great ecological cost. Given our ongoing water crisis, that's some serious waste when you consider how many washing machines are running at any given time.
The good news is that “greywater”—gently-used water from your laundry machine—need not go to waste. It can be recaptured and re-used to water your garden. And the State of California recently rewrote decades of restrictive building codes to allow simple residential greywater reuse.
That’s where the “Laundry-to-Landscape” greywater system comes in. Leigh Jerrard of Greywater Corps provided us with the following diagram and instructions so you can install your own system. With this simple, inexpensive contraption, you can use your washing machine’s discharge pump to move your used laundry water out into the landscape, where it enters the soil at mulch basins and irrigates your plants. It’s great for your garden, great for your home, and great for the environment!
Best of all, the Laundry-to-Landscape system can be installed by any handy homeowner and doesn’t require a permit or inspections.
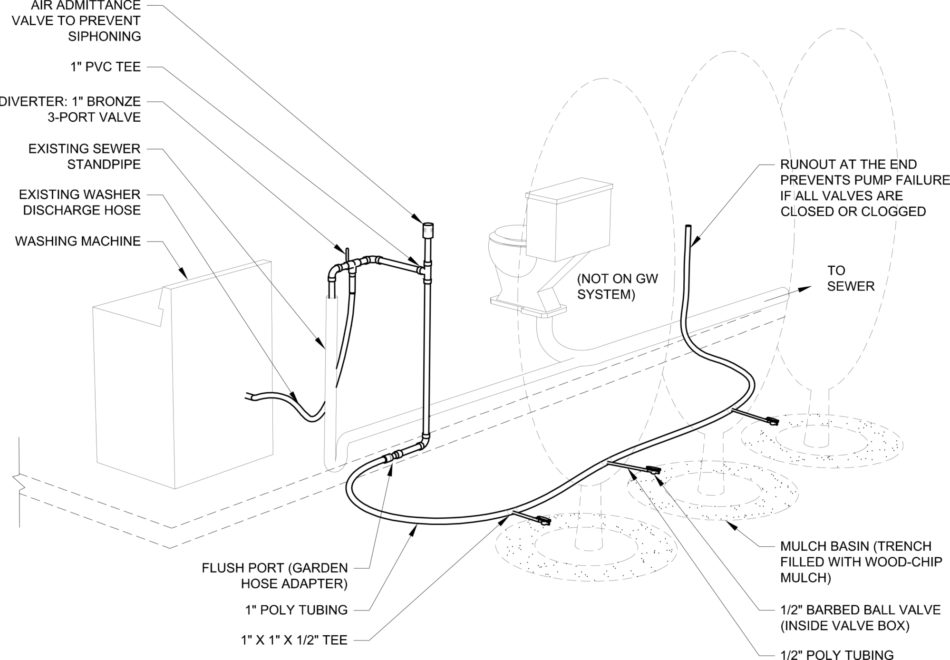
Parts
- 1” PVC indoor plumbing
- 1” polyethylene tubing for mainline outdoor distribution
- ½” tubing for branches
- bronze 3-port diverter valve
- Oatey inline vent
- barbed fittings to attach tubing
Instructions
Step 1 – Install the diverter valve
The diverter valve is a two-way valve that controls where greywater goes – to irrigation or to the sewer. This allows you to turn off the greywater system if your plants are receiving too much water or if you are using bleach or other products you don’t want in your soil. The washer’s discharge pipe should be hose-clamped to a fitting at the middle port; the two side ports lead to greywater and to the sewer standpipe.
Step 2 – Install the inline vent
The inline vent acts as a vacuum breaker, preventing water from siphoning out of the washing machine. The inline vent goes on the greywater side, on the top end of a PVC tee.
Step 3 – Take the pipe through the wall
The greywater line will need to penetrate through the wall or floor to get the water outside. Drill a pilot hole first, and take care to avoid hidden pipes and wires. Use a 1-1/2” hole saw to go through drywall or wood; if your exterior wall is stucco, drill a circle of small holes with a 1/8” masonry bit.
Step 4 – Install distribution plumbing
As a rule of thumb, top-loading washers can irrigate two fruit trees per home resident; front loaders can irrigate one. Switch from PVC to Poly tubing with a barbed fitting, then use 1” tubing for mainline distribution and ½” tubing for branches. Connections are 1” x 1” x ½” barbed fittings. The end of the 1” line should be open and zip-tied to a tree or fence, about 4’ off the ground; this allows water to escape if all the valves are closed.
Step 5 – Set up mulch basins
Greywater is delivered to root systems through thick beds of mulch, which contain large outflows and allow water to migrate horizontally. Mulch basins are 12”-deep trenches full of wood-chip mulch, often encircling a tree to be irrigated.
Step 6 – Install valves and tune the system
Distribution emitters are ½” barbed ball valves. Emitters must be contained in underground valve boxes to prevent clogging and root intrusion. Once the system is all set up, run a load of laundry and adjust the ball valves to get even distribution at each emitter.
Attach labels to the valve and congratulate yourself—you’ve got an eco-friendly greywater system!
Read our review to learn more about Leigh Jerrard's Greywater Corps.
Mention Neighbor2Neighbor: Greywater Corps offers Neighbor2Neighbor readers $30 off initial at-home consultation.
| Share |
| Categories: | Transition Town |


